In my six weeks of blogging experience, I have figured out one key concept: blogging is really fun.
The whole concept is amazing! You’re telling me I get to spend my time talking about what I like, about things that I claim to have some knowledge about (whether or not it’s useful knowledge, I’ll leave up to you), with people who are just as interested as I am on this topic and want to hear what I have to say? And then I get to hear what they think as well and we all have a great time doing it?
In case you can’t tell, I’m completely hooked.
However, I think the biggest surprise for me has been the incredible level of interest. And I say that with all due respect to my friends.
You see, I’ve been harping on to them for years about various financial principles.
True story: I spent an afternoon on a boat last year with four friends for one of their birthdays and spent at least half an hour while sunbathing* explaining to all of them what an index fund is. Which I’m sure they loved.
*They were sunbathing. I was contorted into the same shape as the tiny sliver of shade provided by the boat’s mast as I can almost get sunburned at night.
So it brings me no end of happiness to see that people are actually interested in finding out just how to get their finances under control!
How many people?
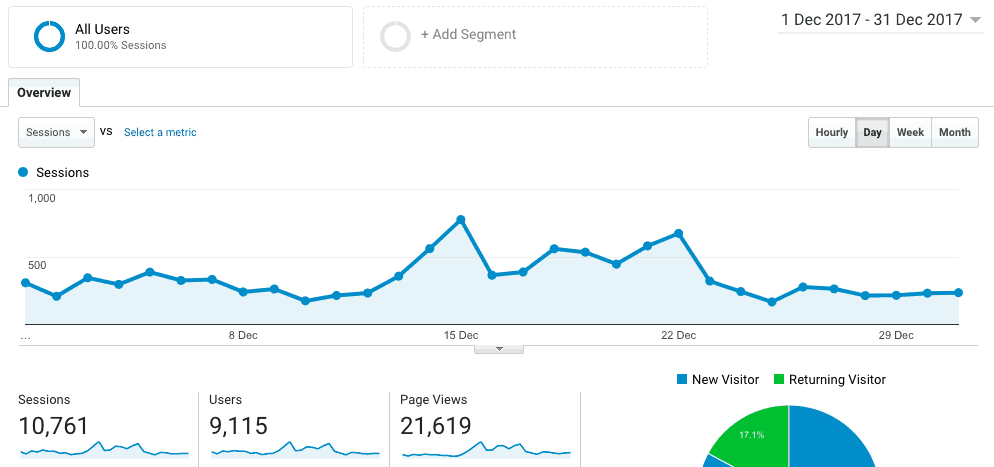
Well, I was blown away to see that during my first full month of blogging, this website received 21,619 page views.
Better yet, this was (almost) at no cost!
So given how much I appreciated reading advice before I started on how to drive traffic to a new blog, I thought I’d also share with you what I did to get those kinds of numbers.
Want to start your own blog?
- Check out How to Start a Blog in Less than 15 Minutes, a step-by-step guide to setting up your new blog which shows just how quick, easy and (importantly) cheap it is!
A very brief history of my very brief blogging career
I’d long toyed with the idea of starting a blog. And then as I combed through income reports and read about all of these success stories, I realised more and more that I wanted to give this a go.
Finally, in mid-October 2017, I decided to bite the bullet and do it. I was going to start a blog!
Look out, internet, here I come!
….well, not quite. I then spent about five weeks writing posts and playing with the look of the blog.
In fact, let’s be honest: I spent way too much time working on the blog’s appearance, which certainly slowed down the production of content.
I’ve heard from a few people now that this is quite common, but just to repeat what they all said (and what I clearly ignored):
Don’t worry so much about what your site looks like. What’s far more important is what content the site provides. That, after all, is what people come to see.
In any case, I steadily published more articles until mid- to late-November 2017, which absolutely no one saw, at which point I decided I wanted to begin publicising the site to start driving traffic.
You may have realised that I just said “mid- to late-November” when the screenshot above sets out one month of information starting from 1 December 2017.
I’ve decided to do it like this simply because it’s easier to track from month-to-month. If I count every month starting on about the 21st, it will quickly become difficult to monitor.

Try to figure out when I started implementing this strategy.
This means that December 2017 was my first full month of blogging. As such, I received just over 21.6k page views during my blog’s first full month.
Want to see how?
What drove all of this traffic?
As you can from the screenshot below of my stats from December, social media was clearly the main driver of the vast majority of my traffic.
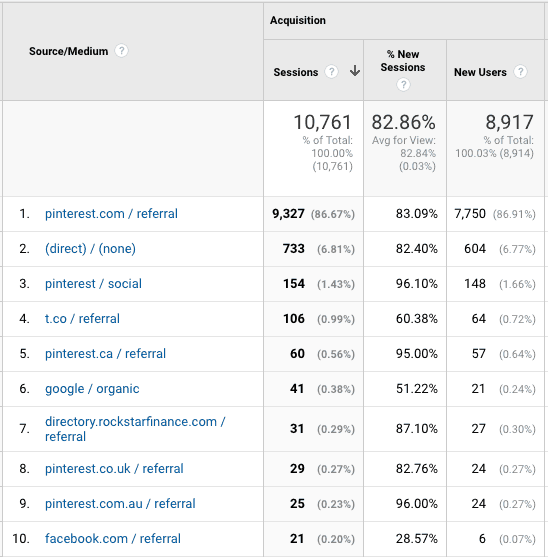
That is, almost 90% of my traffic came from Pinterest.
What’s incredible is that this is in spite of the fact that I easily spent far less time doing Pinterest-related work compared to other aspects of the site.
Pinterest has thus absolutely been the key to accelerating my blog’s traffic during this first month.
However, this hasn’t simply been a matter of pinning randomly and hoping for the best. From day 1, I’ve made sure to have a set strategy in place in order to maximise the power of Pinterest.
Keep reading to find out the steps I follow to make each post Pinterest-ready!
Psst! Want to follow me on Pinterest to see this strategy in action? If so, click here —> Follow me!
1. Have enough posts ready to go and be aware of timing
As of December 1st, I had exactly twenty posts published and released another ten throughout December. This ensured that I had plenty of content to promote during the month.
In addition, all of the posts except one were more than 1,500 words long. Not only is this considered more favourable by Google, but it’s been shown that longer content is more likely to keep people interested in your work. Which, in turn, leads to more subscribers!
So I’m convinced that the number and length of my posts were super important in driving my traffic during December.
Finally, I made sure that my six Christmas-related posts were published in November. This meant that I could spend December promoting them heavily, just when people are getting into the holiday season.
It also gave me some time to ensure that the pins for those posts were in circulation throughout Pinterest which, in turn, increased the chances that they’d be re-pinned by other users.
Lesson learned: Be prepared for special events that may result in increased traffic well in advance!
2. Turn your posts into clickbait
Pop quiz! Which of these headlines are you more likely to click on?
Why you should invest
or
How to become a millionaire (by only saving 10% of your income)
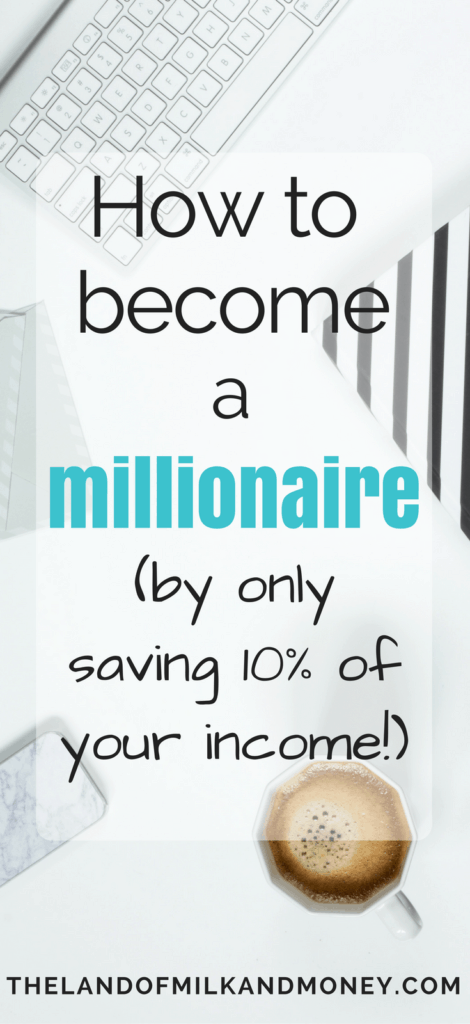
No question – it’s the second one, right?
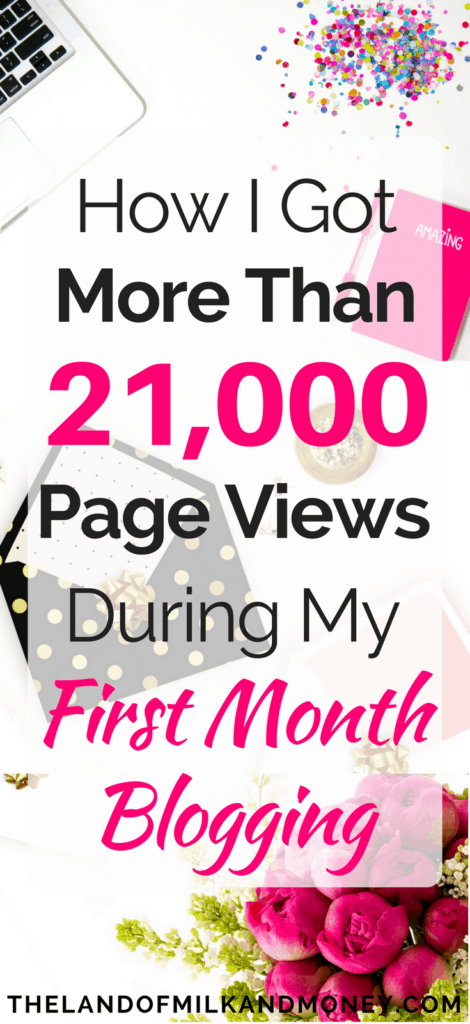
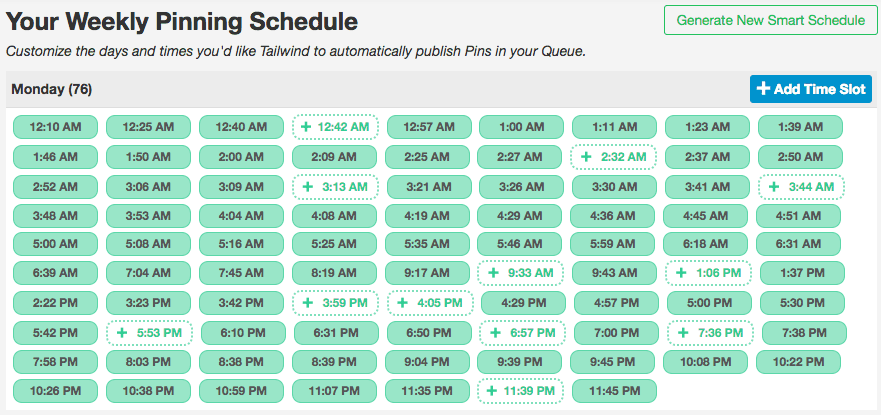
This headline was on what was easily my most popular pin in December – and, to be honest, it wasn’t even close to being my favourite when I made it!
(You can see it on the right here.)
The article it links to became, in turn, far and away the most read post during this period.
It’s an article about the magic of compound interest (it’s here, if you want to read it) and how, if you start early and invest over time, small amounts can easily become a whole lot more.
However, if I showed you an article with the headline “WHY COMPOUND INTEREST IS COOL”, you’d probably keep scrolling.
But make it a bit clickbait-y? Suddenly, we have a winner!
There’s a reason that Buzzfeed is so huge. Headlines like 19 Bacon Hacks You’ll Wish You’d Learned A Whole Lot Sooner (go and read it, I’ll wait) quickly catch your eye and draw you in. It wouldn’t be quite the same effect if it simply said “How to cook with bacon”.
So you have to apply the same logic to your pins!
It’s not a lie – for example, my most visited post in December 2017 really does show you how to become a millionaire if you only save 10% of your income! But it’s not the main point of the post, nor is it the title in the post itself.
So scroll through Buzzfeed and similar sites for some inspiration on how you can draw people in.
Then, for each post that you make, prepare three to four clickbait headlines about an interesting or exciting point in your post.
Something that will catch people’s eyes – and, ideally, that shows a clear benefit for the reader.
Now, hold on – these will become your pin headlines soon!
3. Make your pins picture perfect
I’m far from the most creative person on the planet. Luckily, this doesn’t matter in the world of Pinterest! Simply by following a few rules, making picture perfect pins is super easy.
Based on the success that I’ve had, as well as the tips and tricks I’ve picked up through reading Pinterest advice from the experts of the blogging world, I’d recommend that you always keep the following in mind when creating your pins:
The bigger the better
You want your pins to stand out from the sea of other pins and one easy way to do this is to catch people’s eyes by the sheer size of yours (now now, keep your mind out of the gutter).
In my case, all of mine are 735 wide x 1600 long. You don’t have to use those exact dimensions if you don’t want to, but just always make sure your pins are long, not wide.
Use the largest font you can
Keep in mind that most Pinterest users are on their mobile phones. As this clearly means a smaller screen, you have to make sure that the words on your pins are not only legible, but stand out from the crowd.
Light colours, not dark
It’s been shown time and time again that having a light background for your pins is considered much more attractive and, consequently, is more likely to have people clicking on them. So make sure you’re choosing background pictures that are pin-appropriate. And on this point…
Use great photos
This kind of ties in with some of the other points, but it’s worth mentioning that you don’t need to pay for beautiful pictures! I use the following sites for my pins’ photos:
Don’t include faces in your pins
This is a bit of a funny one and not one that I’ve tested myself, to be honest. Nevertheless, most Pinterest experts will advise that pins that include people’s faces tend not to be re-pinned as often as others. So keep the “women laughing alone with salad” photos for another time.

Salad is hilarious! Source: The Hairpin
Create at least four pins per post
You may have seen references around the internet to “A/B posts”. This simply refers to you trying two different things (i.e. option A and option B) and seeing which one works better for you.
However, I prefer the A/B/C/D test when it comes to pins. That is, I try to create at least four pins per post.
I then spread them around my group boards (more on that below!), as the fact that the pins are different make me look less spammy. This may not necessarily be the case if I was repeatedly posting the same two pins in relation to a specific post.
Use a great app (that’s way cheaper than Photoshop) to create your pins
It’s completely unnecessary to use something like Photoshop (particularly when it’s as expensive as it is!) for creating your pins.
At the same time, just using Paint won’t cut it either. After all, you’re looking to stand out from the (massive) crowd.
So for a great app that even provides templates for making fantastic-looking pins, I’d really recommend PicMonkey.
It has a huge range of tools that are so good at making your pictures look professional. But, best of all for Pinterest purposes, they also have amazing templates that you can use to create your pins.
This is not simply a “chuck some text on a picture” kind of thing. You know the kind of pin I’m talking about. It’s usually one that you’d never click on.
Instead, this app allows you to easily make really great clickworthy pins. Even for those of us who are – ahem – not so creatively inclined.
All you have to do is choose some pictures, drop them where the app tells you to, add some text using one of the tons of fonts that PicMonkey has – and you’re good to go!
Sign up here for a free seven day trial of PicMonkey to start checking it out!
4. Become a member of (good!) group boards
Group boards are the bomb. (Do people still say that?)
Free advertising for your blog to potentially hundreds of thousands of people, if not more? What’s not to love?
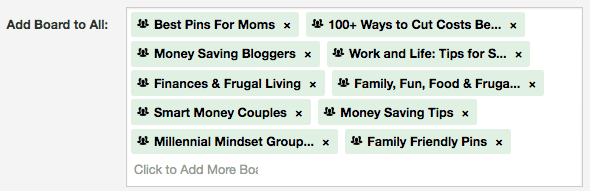
If you’re not sure what I’m talking about, have you ever seen this while wandering around Pinterest?
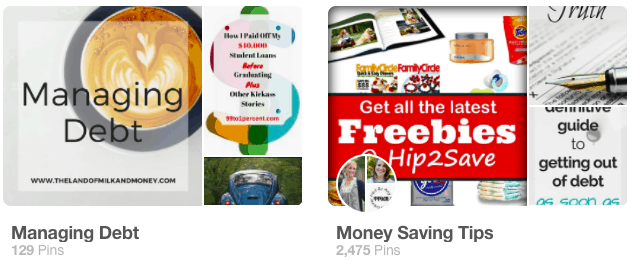
On the left is one of my boards. On the right is a group board, which you can tell by the fact that it has a little circle on the bottom left with three users’ pictures in it, with the user on the left of the circle being the board owner.
Pinning to group boards is an amazingly effective way to have your pins seen. Accordingly, your ultimate goal is to become a contributor to group boards that have as many followers as possible.
After all, every time you pin to a group board, that pin could theoretically be seen by all of the board followers, who then all become potential visitors to your site. Therefore, the more followers, the better potential your traffic has to sky rocket.
However, this is certainly a case of “easier said than done”.
I read a lot of advice online about how you shouldn’t join group boards that have less than 10,000 or even 20,000 followers as “it’s not worth it”. Personally, I’m not sure I agree with this advice.
You see, it’s relatively easier for more established bloggers, who have thousands of their own followers along with a well-developed network of other bloggers, to be accepted into the large group boards.
For those of us just starting out, we won’t have anywhere near those numbers in our Pinterest profiles. As such, we’re not in as high demand as those who have been in the game for some time. This means that it can be a lot harder to be accepted into these boards.
Consequently, those of us who are earlier in our blogging careers may have to lower our standards a bit.
In my case, I’m a contributor to 35 group boards, some of which do better for my pins than others. However, I’ve easily contacted more than double that in trying to become a contributor.
(The struggle is real!)
I generally aim for group boards that have at least 5,000 followers, although I admit that I’ve broken that rule a few times and joined group boards that have less than that. I’m still trying to figure out if it’s worth it or not.
I also now mainly aim to join group boards that are specific to my niche. A number of group boards have titles similar to “Pin Everything!” These then get massive amounts of followers but also massive amounts of contributors, meaning that a huge number of pins are rolling through that board each day.
Not only does this mean that a lot of the followers may not be interested in your specific niche, but it can be really difficult to get your pin seen when it’s rapidly pushed down the screen.
Going forward, I think this is the rule that I’m going to follow more strictly, as I’ve really noticed the difference that it makes. Pins in group boards that relate to personal finance seem to get way more clicks and re-pins than those in the more generic boards.
So, in summary:
- While ideally you would only join group boards with larger amounts of followers, in the beginning, aim a bit lower (around 5,000+). You can then apply to be a contributor to larger group boards as you become more established in the blogging world; and
- Aim to join group boards that relate directly to your niche.
Bonus tip: Take a look at PinGroupie, a free website that helps you find great group boards for your niche.
5. Automate your pinning
This part has been the absolute key to generating the number of page views I got in December. It was also a solution to a major blogging problem I was facing.
You see, like many of you, my time is super limited. This manifested in two different ways.
Firstly, I have a full time job and the end of the year is particularly busy. This meant that I had to make sure that I was taking advantage of every free second that I had to work on the site.
Secondly, over 70% of visitors to The Land of Milk and Money throughout December were from North America. However, I’m not.
Based on my timezone, this has meant that the busiest time on the blog is from midnight to 8am. Obviously I can’t be awake pinning all night (I’m sure the aforementioned full time job would love that the next day!) and even pinning manually throughout the day would take forever.
So automation has been a lifesaver!
How to automate
I have no hesitation in saying that these results in my first full month of blogging are predominantly due to Tailwind.
Tailwind is a Pinterest scheduler that allows you to quickly and easily schedule pins – both those you created and those belonging to other people – across all of your boards. This means that it’s saved me a ton of time.
Honestly, I do seven days of pinning once a week, which takes about one hour.
This means that I spend one hour per week generating over 90% of my traffic.
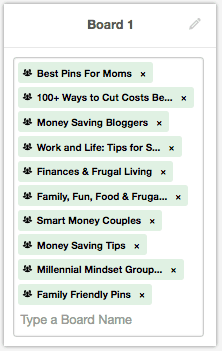
It even tells me the best times to pin! I’ve currently told Tailwind to pin 70 times per day. Consequently, this is the schedule that it generated for me for Monday, for example.
There’s no way in hell that I’m going to manually pin at 12:10am, then 12:25 am, then 12:40am…so the fact it does it for me is amazing.
All you do is tell Tailwind which pins you want to pin (or re-pin) and to which boards you want them to go.
You can even do Board Lists to save you more time! For example, I could tell Tailwind to send a certain pin to a specific group board if I wanted to.
Or I could do this…
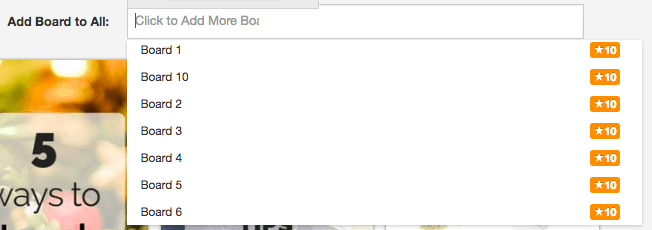
Step 1: Set up board lists
That is, create lists of the boards to which you’re a contributor. It essentially groups the group boards to make it easier for you to assign pins to all of the boards at once.
(Sorry about the boring ‘Board 1’ name. You should definitely feel free to be more creative than me!)
Step 2: Tell Tailwind you want to pin a bunch of pins
You’ll then have the option to select a board list rather than an individual board AND you’re able to apply this selection to all of the pins that you want to pin.
(Are you sick of the word “pin” yet?)
So say I have ten pins. I want to select three board lists that each have ten boards on them and then apply this selection to all of the pins. That’s three clicks (one for each board) then the ‘Schedule’ button.
In four clicks, I’ve just pinned 300 times. If you’ve set Tailwind to pin 70 times per day, that’s more than four days of pinning in only a few seconds.
My other favourite part of Tailwind is the analytics it provides, which I’ve found to be much better than Pinterest itself.
I use it all the time to check which are my best performing pins, because I’m sure as hell going to keep pinning them!
It also tells me which group boards have given me the most re-pins, clicks etc.
This is – again – such a time saver as it shows me exactly where I should be focussing my pins.
If you want to try Tailwind, you can get a free trial of 100 pins if you sign up through this link.
However, as I wanted unlimited pins, I ended up paying for the annual subscription at $9.99 per month.
Considering how critical this has been to my page views and especially given how much money I could one day be making from this traffic, paying that little is a steal.
Honestly, it’s transformed my blog. There’s no way I could have gotten more than 21.6k page views in that first month of blogging without Tailwind. I can’t recommend it enough, especially if you’re like me and simply don’t have the time to manually pin that many pins.
Which pins to pin
(Ok, even I’m getting a bit sick of the word “pin” now…)
You may be surprised to hear that you should also be focused on re-pinning other people’s pins!
This is because it’s better for your own reach. After all, by re-pinning, your name will be attached to other people’s work – which is particularly great if it’s a popular pin!
That is, if Pinterest users are interested in what you’re pinning – even if it belongs to someone else – that works out even better for you!
For example, I re-pinned someone else’s pin to one of my boards. Then, someone who follows that board re-pinned the pin. This is what appears at the bottom of that re-pinned re-pin:
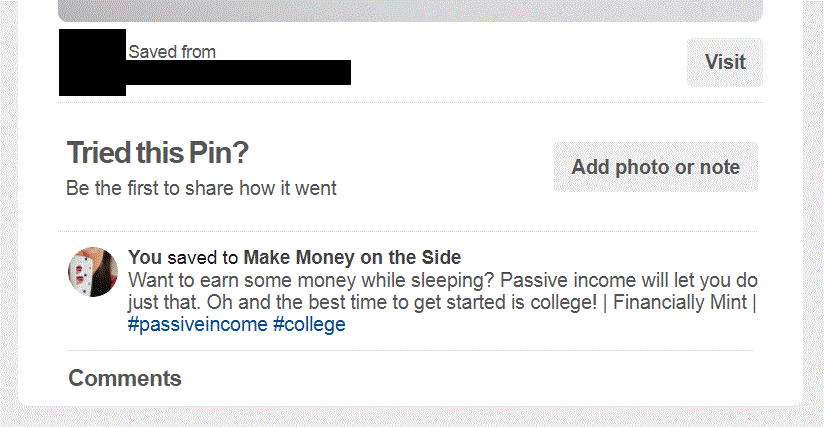
As you can see, even though it’s not my pin (I didn’t even write that caption!), people will be able to see my name when they click to open that pin.
This is great for the original pin owner (as hopefully people will click on the pin to go to the post). But it’s also great for me in terms of spreading my reach!
It’s also excellent for the board from which the pin was re-pinned. After all, see how the picture above says “You saved to Make Money on the Side“? This is a clickable link to my board.
So by having my board name and link on this re-pin, it increases the chances that other people will see the board name and click through to become a follower.
And, as we’ve already mentioned, more followers of your group boards means more potential visitors to your site!
It’s also excellent for the group boards to which you contribute if you re-pin other people’s pins. This is why most group board owners make this a rule for contributors.
Not only is this because it allows more people to hopefully become aware of the group board and consider following it. Re-pinning from group boards also increases the rate of engagement of the board (i.e. it shows that the board is more effectively ‘spreading’ its pins, including yours).
This, in turn, further benefits you by increasing the chances of your pin circulating – even if you aren’t the one to re-pin it!
My pinning strategy
So what did I do to get this level of traffic through automation?
Many sites advise pinning 20% of your own work and 80% of others’. I haven’t been following that exactly.
Instead, I do 50% of mine and 50% of others’ pins. This is the process that I follow.
Step 1: I select seven of my existing pins
This will be a mix of pins that have performed well in earlier weeks, pins that perhaps weren’t as successful but that I want to try again and pins that haven’t been entered into circulation yet, such as from a previous week’s post.
In addition, as I aim to publish two posts per week, I include a pin from each of these posts.
Time spent: Two minutes (including checking analysis from previous weeks)
Step 2: I tell Tailwind to pin these seven pins to all of my group boards
As these will be going out over a week, none of the boards will be spammed. This also ensures that I comply with any group boards that have rules such as “only two pins per day”.
Time spent: Ten seconds
Step 3: I select seven pins from other people on each of my group boards
This is probably the step that takes the most time, but it’s a great way to ensure that I’m contributing to the level of exposure and engagement of these boards. It also makes sure that I follow the group board rules that require a certain level of re-pinning.
Step 4: I tell Tailwind to re-pin all of these to my own boards
I currently have 12 of my own boards, each on a different subject, so I simply allocate the re-pins according to where they best fit.
Time spent (steps 3 and 4 combined by using the Tailwind browser extension): Around 35 minutes i.e. one minute per group board
With seven pins being pinned to 35 group boards and seven pins being re-pinned from 35 group boards, this is exactly 490 pins. Over a week, this is equivalent to 70 pins per day, which is the precise setting I have in Tailwind.
All in all, it takes less than one hour. And considering the sheer number of page views you can get from that – for me, over 21,600 in my very first month blogging – it’s definitely time well spent!
If you’d like to apply this same strategy to your blog, grab this free Accelerate Your Blog Traffic Checklist so you can apply these tips to each one of your posts and start seeing your page views sky rocket. The checklist even works directly on your computer so no need to print!
Don’t forget to take advantage of your free Tailwind trial and get 100 pins for free by signing up through this link!
And, if you’ve been thinking about starting a blog, find out just how easy it is to do with our step-by step guide: How to Start a Blog in Less than 15 Minutes.
2 comments
Queen Money Bee,
This post is absolutely fantastic. Thanks so much for the specific breakdowns, look forward to collaborating with you in the future!
Thanks for the detailed layout of your Pinterest strategy. Just to confirm – does this mean that you have one of your own personal pins going to all of your group boards once a day? Then the next day a different one of your personal pins going to all of your group boards and so on?
Thank you