So you’ve decided to start a blog. Congratulations!
Whether you’re looking for a way to share your expertise with others or are keen for a new side hustle, starting a blog is a great way to do so.


And, as icing on the cake, seeing the monetary results that some bloggers have had with their blogs is really inspiring! To think that you can turn a small side hustle into a full time income is truly something to aspire towards.
You should, of course, be prepared for some hard work and a lot of patience, as there’s no such thing as overnight success in the world of blogging. However, there’s absolutely no reason why you can’t achieve as much as others have in their blogging careers.
Even better, with the amazingly discounted price of less than $4.00 per month that I’ve gotten for you through this link, it will cost you less than the price of a cup of coffee to start your new blog – and will take you less time to set-up than it takes to drink the coffee as well!
And you know what they say: “A year from now you may wish you had started today.”
So if you’ve been thinking about starting a blog, then there’s no time like the present!
Since establishing The Land of Milk and Money, I’ve learnt an incredible amount and have met some amazing people online in the blogging community who I never would have stumbled upon otherwise!
While I’m certainly not raking in the big bucks like other bloggers, I can already see that there’s so much potential to do so. And if I can do it, then you absolutely can as well!
So let’s find out just how easy it is to get started.
1. Choose your niche
A “niche” is simply the topic that you want to blog about. And as there are about one million topics out there, your options are almost endless!
This can make choosing one to focus on a fairly difficult decision.
Fortunately, as a way to make it easier for you, I once heard a great tip that your chosen niche should be something that you can’t shut up about.
Can’t stop nagging your friends to try the latest vegetarian recipe that you’ve discovered? Do you post incessantly on Facebook about the best hikes in your area? Are you a self-proclaimed expert on red wine? Do you love recommending video games to your friends?
Then maybe that’s the thing that you should start writing about!
After all, you’re going to be writing hundreds of thousands of words on this niche. Better make it something that you love – and that you know how to make others interested in as well!
Another great tip is that you shouldn’t be discouraged just because someone else is writing on your chosen topic. In my case, there are literally tens of thousands of blogs on personal finance.
At the same time, there are 3.5 billion people in the world with internet access (source). Meaning that there’s plenty of traffic to go around.
You also have to have confidence in your knowledge of your chosen niche and your ability to share this knowledge with others.
For example, I’m a huge fan of a number of other bloggers in the personal finance community, but I also think that I have a lot to add to many of the topics that they may have already written about.
It’s about being able to put your personal spin on things. And the best way to figure out your own spin is to jump in and get going!
2. Choose your blog’s name
There are two main things to consider when selecting the name of your blog: does the name work and is the domain available?
Think carefully about which name you want to use, as it will be the key aspect of your branding going forward.
It doesn’t necessarily have to include words that relate directly to your chosen niche. Who would ever think looking at the word “Amazon” that it would be the world leader in online shopping and not a website about rainforests?
Having words that are relevant to your niche in your blog’s name – such as “Money” in “The Land of Milk and Money” – may help people find your blog when they are searching online.
That said, it’s not critical. After all, I think you’ll agree that howIplantoretireearly.com shows you immediately what it’s about. At the same time, it’s far less interesting than, say, catchingcoins.com (which is currently available!)
In the end, what’s more important is that it’s something that’s catchy and memorable. If people can’t easily remember your blog’s name, then it will be difficult to get returning visitors.
Try to also pick something that can’t be misinterpreted. For example, I was on one website the other day where the second word in the URL was “experience” and the first word ended in the letter “S”. I think you can see how that could be misread.
You may also want to choose a name that won’t create any spelling difficulties. A friend’s business has something similar to “Eye Can” in the name. This is meant to be a play on words of “I can”, but she spends a lot of time explaining: “Yes, it’s spelled E-Y-E, not just the letter I.”
Not only is this annoying for her, but it risks people typing the wrong spelling into Google when searching for the business and being unable to find it.
So clearly there are a bunch of considerations when choosing your blog’s name!
However, all of that said, you can’t pick a name for your blog if the domain is no longer available.
A domain is the main part of the URL that directs readers to your site. For example, in my case, the domain is “thelandofmilkandmoney.com”.
As it’s clearly ideal for your domain to match your blog name, you’ll need to check for available domain names before definitively settling on a name for your blog.
I’ll explain how to do that next!
In addition, you’ll have to buy your domain, which usually costs around $15 per year.
Fortunately, if you follow the steps below and sign up with Bluehost, you’ll get a free domain name.
See the next step to find out how!
Bonus hint: Once you’ve chosen your blog name (and locked it in, as explained in the next step), make sure that you secure that handle on all major social media sites.
3. Sign up for hosting
A hosting service provider simply provides the technology needed to make your website viewable on the internet. So it’s definitely something you need when setting up your blog.
There are a range of companies that offer this, but I’ve chosen to use Bluehost for this blog and I thoroughly recommend that you do the same. Why’s that?
- I have zero technical knowledge and it was incredibly easy to set up my blog with them.
- They’ve been extremely responsive the few times that I’ve had questions or needed technical support. Given the time zone that I’m in, questions have arisen extremely early in the morning or late at night in the US and I’ve only ever waited for a couple of minutes in their chat program to resolve the issue.
- When you purchase one of their super cheap hosting packages, you get a domain name (worth $15) for FREE.
- It means that you’ll be self-hosted, meaning that you can monetise your blog. Whether you intend to keep your blog as a side hustle or hope to turn it into your full time income one day, this is incredibly important.
- It looks far more professional to have your blog hosted like this.
- After all, it means that your domain will be, for example, catchingcoins.com rather than iwanttoretireearly.blogspot.com. This will make it better for you in future when reaching out to your audience, who are more inclined to trust a professional-looking website, as are companies with which you may want to partner.
- You get at least five free email addresses that match your domain.
- This is why you can contact me at [email protected] rather than [email protected]. Far more professional, no?
- You can get a full refund within 30 days of signing up if you get cold feet and feel that blogging isn’t right for you.
Even better, I’ve managed to secure a great discount offer for readers who create a blog with Bluehost through this link.
For the special reduced price of less than $4.00 per month, you can have your blog up and running in no time.
Here’s how!
How to sign up for Bluehost
Step 1: Select your Bluehost plan
After clicking the sign-up link, this is the first screen you’ll see:
 You’ll probably only need the Basic package. That’s all I use and it’s been more than enough. Keep in mind though that, if needed, you can upgrade at any time in the future.
Step 2: Select your domain
One of the great parts about Bluehost is that you get a domain for FREE. So this next screen is where you do just that:

As mentioned above, there are a range of things that you should consider when selecting your blog name and domain.
An example can be seen in the screenshot above. If anyone is interested, it turns out that mynewblogisawesome.com is currently available! (…I definitely wouldn’t recommend going with that.)
I would add that you may have thought of an amazing blog name but, sadly, when you enter it into the box above, you find out that the .com version is taken. However, you then see that, say, .net is available.
I’d recommend thinking very carefully before selecting any domain name other than .com. Generally speaking, sites with a domain ending in .com are seen as more legitimate, which will become very important in future if you wish to monetise your blog.
Of course, this is not always true. So if you feel that your domain is perfect and that one of the other domain names besides .com would work well – especially if it makes your domain more creative (try going to http://youtu.be, for example) – then go for it!
Step 3: Enter your account, package and payment information
I. Account information
The next part is fairly self explanatory. You do have to put your real information, but we’ll cover how to hide that from the world at large in the next step.

II. Package information
Next, scroll down to where you select the hosting package information. As mentioned, I’ve managed to lock-in a discounted price of less than $4.00 per month if you sign-up at this link for a three year term.
That may sound like a long time, but you’re in this for the long haul, right? This is in addition to the fact that the monthly rate is cheaper if you sign up for the longer term.
Of course, if you’re more comfortable with a shorter package, such as the 12-month account plan, then you should definitely feel free to go with that. The 12-month package is also discounted when you access it through the sign-up link and certainly still represents a great deal – especially when you consider the earning potential of your soon-to-be blog!
(And noting that you still get the free domain and all of the same services as the three year option!)
So simply select your chosen package in the drop-down menu as seen below.

I wouldn’t bother selecting any of the boxes below the drop-down menu except for Domain Privacy Protection.
This means that people wont be able to see your personal details when searching for information on your blog through Whois, including your name and address. Not only is this good from a privacy perspective, but it will prevent marketing companies from obtaining your information and using it to spam you.
Trust me that it’s $0.99 per month well spent.
III. Payment information
You’ve all shopped online before (…some of you more than others!) so you all know what to do here:

Click ‘Submit’ – and that’s it! You’ve successfully signed up for hosting services – your blog is on its way to taking the internet by storm!
Step 4: Additional information
After submitting the payment, you’ll be prompted to do a few things:
- Purchase additional domain names. For example, if you’ve locked in mynewblogisawesome.com, Bluehost will ask if you want to also purchase mynewblogisawesome.co, mynewblogisawesome.me etc. You don’t have to do this (I didn’t, for example) but you may want to if you don’t want anyone to launch a website with a similar domain to you.
- Create a password. Make it good; getting hacked isn’t much fun.
- Pick a theme i.e. your site’s appearance. Feel free to just skip this for now as you can do that at any time at the end of this process.
And you’re done with the Bluehost set up! You see, after only a couple of minutes, you’re more than halfway through the process.
4. Pick your blogging platform (hint: go with WordPress.org)
There are a number of blogging platforms out there, the main ones being Tumblr, Blogger, WordPress.com and WordPress.org.
I could explain to you the pros and cons of each (and there are plenty of other sites that do if you want to wander down that Google path) but, instead, I’m going to save you some time and recommend WordPress.org.
More than 26% of all websites on the internet are built on WordPress (source), including a huge number of well known sites such as The New York Times, National Geographic, Forbes…and Beyonce’s official site. So you know it’s legit.
WordPress.org is also completely free to use (although you will have to pay a small amount for hosting – but don’t worry, you’ve already covered that by signing up for Bluehost).
You can also do things like customise your site and install plug-ins, which are the things you add to insert different functionalities on to your site.
Perhaps most importantly, you can make money from your site, which is not possible with WordPress.com.
While WordPress.com is completely free (i.e. you don’t have to pay for hosting), you’re far more limited in what you can do.
For example, you’re not able to add Google Analytics or any other tracking platform, which are invaluable. WordPress will also place their own ads on your site which you won’t make any money from. You’re also very restricted as to the themes (i.e. your site’s appearance) that you can use.
It’s also incredibly easy to set up a blog on WordPress.org with Bluehost. You can literally be typing your first blog post within 15 minutes of starting the sign-up process.
For the vast majority of people starting a blog, WordPress.org is the way to go. The only downside is that you have to pay for hosting, but we’ve already covered how incredibly cheap that is.
And considering the benefits of hosting your own site on WordPress.org, including that you can make thousands of dollars back on that initial investment, it’s more than worth it.
Ready to find out how?
How to install WordPress
Step 1: Go to your cPanel
After you’ve completed the previous steps, Bluehost will have sent you an email. This contains information on how to log in to your cPanel, your web hosting control panel where you control everything. Importantly, at this stage of the process, you’ll go here to install WordPress.
So click on the link in the email to go to your cPanel.
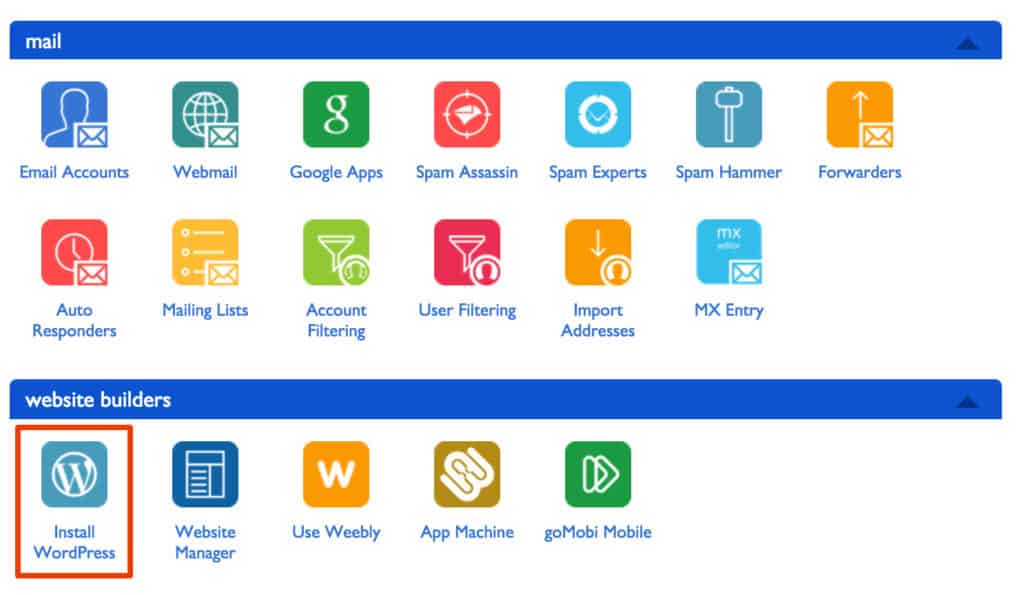
If, for whatever reason, you don’t open up on the correct page, go to this page, click ‘Login’ at the top right corner and enter the login details that you just created. Once you’ve logged in, this is what you should then select at the top of the page.

Once you’ve clicked the link in your email OR logged in as explained in the step above, you’ll see a bunch of icons. Don’t worry about these as you’ll never use most of them. What you’re looking for is the one marked with the red square in the image below labelled “Install WordPress”.
Step 2: Install WordPress
After you’ve selected the previous icon, the following will appear on the next screen.
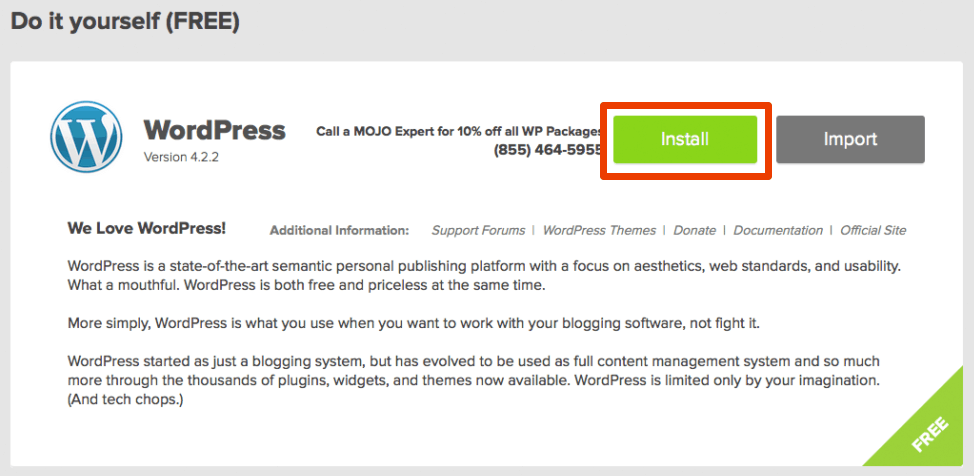 Click Install in the “Do It Yourself” option as per the red square in the image above. It’s free and incredibly straightforward to do, so there’s no reason to pay for this.
Then you’ll see the following:
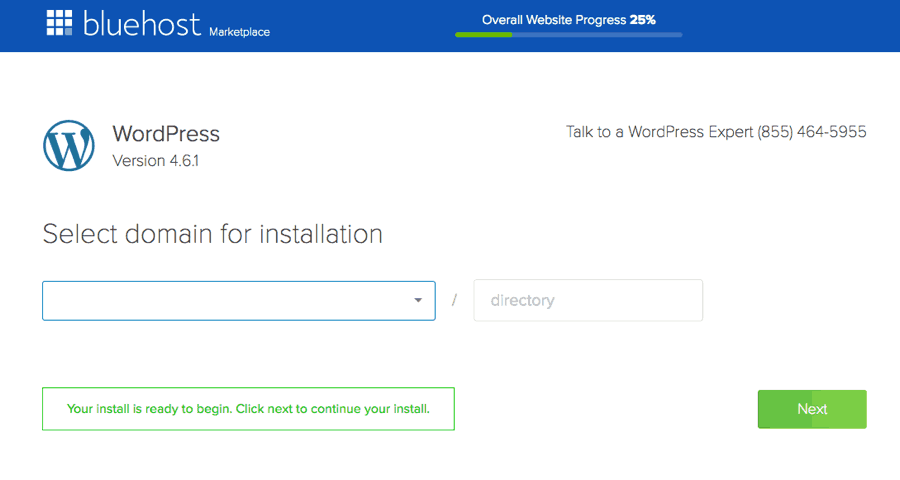 Select your domain name (the one you got when you purchased your Bluehost package) from the drop down menu.
Click Next. Then click Show advanced options.
Step 3: Final steps
You’ll be prompted to enter your “Site Name or Title” (i.e. your blog name, not your domain). You’ll also be asked to create an “Admin username” and “Admin password”.
Note: Don’t use the word “Admin” as your admin username. Also, make sure that the password is as complex as possible. This is to make it as difficult as possible for someone to hack your site.
Make sure that the various boxes are checked. This includes the one that asks if you wish to “Automatically create a new database for this installation”.
Accept the Terms and Conditions. Then click “Install Now”.
It will load for about one minute. Make sure you don’t click away from the page until a message appears at the top of the page advising you that the install is complete.
(The page that loads at that point may offer you some paid themes and templates. Ignore these – there are plenty of free and paid ones available to you shortly.)
And then you’re done! Congratulations – you’re officially a blogger!
Step 4: Log in to your WordPress dashboard
After completing the previous step, you’ll receive an email with all of your login details. Click the link in that email and, once the WordPress login page loads, enter your username and password.
And you’ll be in your blog!
There are a range of things that you can do once you receive the login details by email after the previous step. These include:
- Select a theme. This is your site’s appearance, with thousands of free themes available. While you can certainly pay for a theme later, you may wish to start off with a free one while you’re finding your feet.
- Go to the sidebar and select Appearance –> Themes then click Add new at the top of the page. There, you can scroll through the MANY free themes that are available and select just how you would like your site to look. Don’t worry, you can change it as many times as you want later.
- Write your first post. Time to launch your blogging career!
- Go to the sidebar and select Posts –> Add new.
There are dozens of other things that you will have to do as a brand new blogger, but these are some great places to start.
If you have any questions about any of the above or anything after this process that you find confusing, feel free to let me know in the comments below and I’d be happy to help.
In the meanwhile, welcome to the blogosphere!
Now that you’ve started a blog, do you want to make sure that as many people as possible are reading it from day 1? If so, check out How I Got Over 21,000 Page Views In My First Month Blogging!